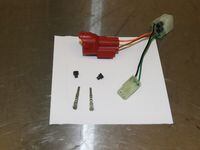
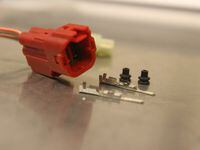
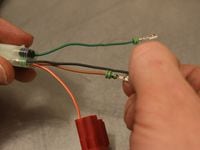
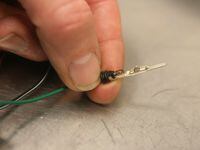
Dirt Rider teaches you how to customize your Honda CRF EFI Tuning Tool connections for ultimate trackside tuningThe future is here. Zeros and ones have replaced round brass thingies with holes in them and we might as well get used to it. The best way to feel comfortable in this world of wires and electronic gadgets is to take them apart like true motocross people and find a way to make them work better.The Honda EFI Tuning Tool is pretty simple, but the system's wiring harness requires you to remove your seat and subframe to plug it in. That makes for some seriously unnecessary tool time. But there is a solution. With a few genuine Honda wire pin connectors, you can bypass the seat-tank ritual and have an ultra-trick, one-plug tuning port easily accessed from the outside.You're done! Now you can plug your bike into your very own factory tuning super computer.If you have no idea how to tune your CRF450R, don't worry; we'll have the full story on fuel injection tuning in the pages of Dirt Rider soon.


/cloudfront-us-east-1.images.arcpublishing.com/octane/LLLQLRK2DBH4PN66MDNA3AFJNY.jpg)
/cloudfront-us-east-1.images.arcpublishing.com/octane/5DMU4K752FBWLLJD432GRAAH2A.jpg)
/cloudfront-us-east-1.images.arcpublishing.com/octane/TGHDVMIODJC4BNKJDZKKTSWXWI.jpg)
/cloudfront-us-east-1.images.arcpublishing.com/octane/5KYMT24REJEFPNO2J2M76MXERM.jpg)

/cloudfront-us-east-1.images.arcpublishing.com/octane/3GXGR3EKSNH5NI3CWHV5SJ7TXE.jpg)
/cloudfront-us-east-1.images.arcpublishing.com/octane/JEU3ONDWEFCAZNAZJOU24OJ2PM.jpg)
/cloudfront-us-east-1.images.arcpublishing.com/octane/JQ6LMK6LLBAQJIL2AH56UIUKWU.jpg)
/cloudfront-us-east-1.images.arcpublishing.com/octane/QUSF4LLRM5DDPCJW25RINQRJPE.jpg)
/cloudfront-us-east-1.images.arcpublishing.com/octane/FYDGK7GF4JBPXERA5RAZPY3YJI.jpg)
/cloudfront-us-east-1.images.arcpublishing.com/octane/JE7KMNASNRGR7FLYAFRZAR7T7E.jpg)
/cloudfront-us-east-1.images.arcpublishing.com/octane/7RCNKJJNXBF4LBKZXE2INNWZUY.jpg)
/cloudfront-us-east-1.images.arcpublishing.com/octane/BAGM5E4EWBHFNLZOXMSLOLKQGU.jpg)
/cloudfront-us-east-1.images.arcpublishing.com/octane/RSX65VBXY5FRLIY4LN6WLOKAFM.jpg)
/cloudfront-us-east-1.images.arcpublishing.com/octane/3EO2CNKWUFBGNMGNJPETW5HCNY.jpg)
/cloudfront-us-east-1.images.arcpublishing.com/octane/IYHM55XRNVHF3DSS3467PZ7ONQ.jpg)
/cloudfront-us-east-1.images.arcpublishing.com/octane/L7K3FIINEBHMZI2TXTUE4FXH7I.jpg)
/cloudfront-us-east-1.images.arcpublishing.com/octane/XE7P5YXNZZDUTIGW4YNWQRDVY4.jpg)
/cloudfront-us-east-1.images.arcpublishing.com/octane/AV55DOHQ3BEXJLPWR6UWLYUSAQ.jpg)
/cloudfront-us-east-1.images.arcpublishing.com/octane/MMROGOYHXZAYDC4RKIDJ4VRSGA.jpg)
/cloudfront-us-east-1.images.arcpublishing.com/octane/FHRWLPEOTBFOHFTQLIHJNIXCFQ.jpg)
/cloudfront-us-east-1.images.arcpublishing.com/octane/J2RUDOXTOZHBXOFCUQKBAGBMAQ.jpg)
/cloudfront-us-east-1.images.arcpublishing.com/octane/UDQASRGJ3ZDG3BANXWU6P5NIQY.jpg)
/cloudfront-us-east-1.images.arcpublishing.com/octane/YIICVWCT7FDURLJQ2H4AIMXLOY.jpg)