Fork Rebuild Secrets With Race Tech - Dirt Rider Magazine

Fork Rebuild Secrets With Race TechDirt Rider

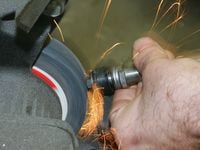
The difference in feel and control of a rebuilt fork is amazing. After fixing our worn fork we could feel much better damping and a crispness to the action that had been missing. Replacing all the bushings gets all the tolerances much closer to like-new. Sure, there's wear on some parts that aren't economical to change, but you're shooting for no side play in the tubes, with the pistons and shims working like they should. If you plan to undertake an overhaul like this, make sure you get the tools needed to get the job done right.

Tech How-To
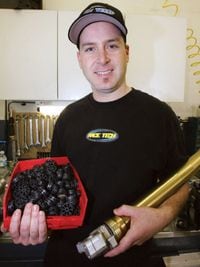
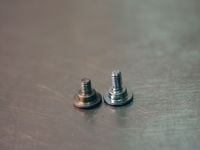
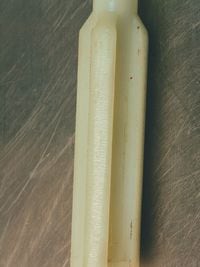
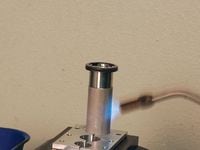
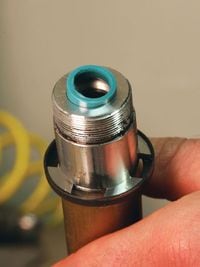
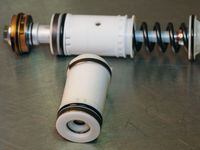
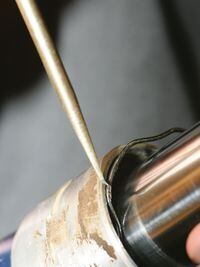
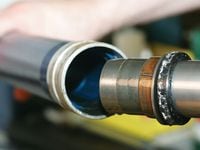
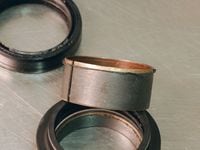
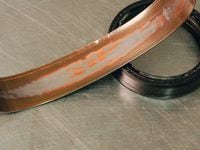
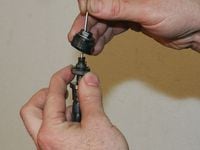
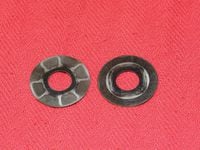
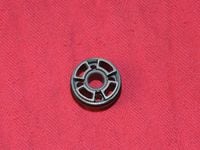
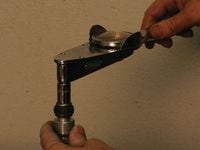
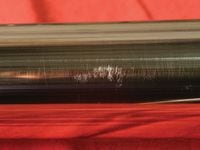
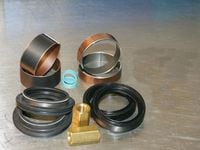
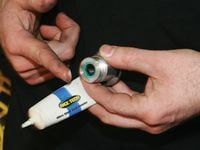
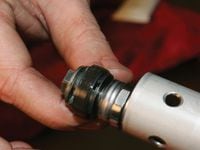
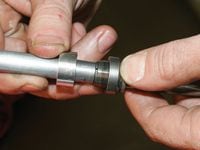
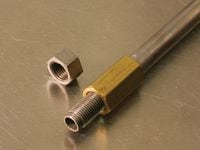
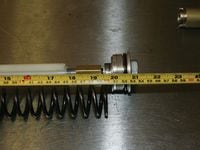
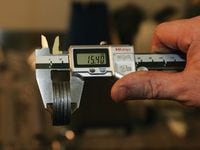
Dirt Rider has shown the ins and outs of disassembly and reassembly of the common cartridge fork designs and how to handle seal replacement and routine service. Here we focus on what to look for when inspecting the fork internals and how to know which parts are worn and need to be replaced. We used a Kayaba fork from an early '90s Kawasaki for many of the photos, since that type of open-cartridge fork is extremely common and is found on models that are probably long overdue for service by now. Specific problem areas of later-model sealed-cartridge Kayaba and Showa forks are included as well. Many suspension parts aren't available from the bike's manufacturer. For example, if you ask for new valve shims, the dealer parts book will most likely say you must buy the entire cartridge. Fortunately, the aftermarket has responded and these parts are available. All of the parts and tools used to refresh this old fork are from Race Tech. Since we aren't dealing with any specific brands here and this isn't a step-by-step rebuild, you'll certainly need a manual to address the bike you intend to service.Your first step is to check and record the suspension settings (so they can be reset later), then turn the adjusters all the way out before disassembly. In addition you see if the adjuster is still working. Normally adjusters should have click detents and a positive stop going in and out. If not, the fork cap or base valve must be replaced. Disassemble the fork as shown in the manual and drain the oil. There may be a different number of spring preload washers in each fork, so keep them with the proper spring. Inspect the parts for damage or wear. At this point the best indicator of problems is the used oil. If it is dark and black or it holds metal chips, there is trouble inside.

01 On late-model Hondas with Showa Twin Chambers the bolts for the fork guards and disc cover look the same, but if the longer bolts are used in the fork guard, it will dimple the tube and prevent the spring from coming out of the lower tube. The axle clamp must be removed to fix it. Race Tech sells a tool for it, but this is a job for suspension pros.Dirt Rider
02 If applicable, remove the parts from the cartridge rod. Inspect the spring guide for wear or cracking. This one has been sanded smaller to clear an aftermarket spring, but is fine to use. Honda CR80/85R forks commonly break these guides. They have no hydraulic bottoming system, and the kids riding them jump them hard.Dirt Rider
03 On this Kayaba fork the bottoming piston has two parts that are unscrewed from each other. Two wire clips under the piston are located in a groove. The clips hold the piston in place, and they can\'t come out when the two halves of the piston are screwed back together.Dirt Rider
04 The top of most cartridge systems has a bushing that acts as a seal or a bushing and a seal. If they're worn, the damping will suffer. To remove the seal head, heat it with a torch or heat gun to loosen the Loc-tite. It\'s almost impossible to remove the seal head without a cartridge-holding tool and a vise-mounted block to safely hold the cartridge tube.Dirt Rider
05 This is the little seal bushing that needs to be replaced. Ronnie Williams easily popped it out with a small blade screwdriver. This seal bushing should be changed every year for serious riders for both early inverted forks and Showa Twin Chambers. Weigh the cost of the tools involved here to what a shop charges; it might be cheaper to have it done.Dirt Rider
06 This is a late-model Twin Chamber seal. Under the seal is a regular steel/Teflon bushing. The seal should be changed roughly once a season for KYB or Showa forks. If the seal wears, the cartridge doesn\'t offer the damping that it should.Dirt Rider
07 This chamber is part of the compression side of a late-model Kayaba fork. At the front, you can see a similar seal to the one used to seal the cartridge tube. When this leaks, the pressure builds inside the chamber and breaks it. Race Tech drilled the one in the rear to solve the problem. Change this seal every time you service the fork.Dirt Rider
08 Once the cartridge is out, the inner and outer fork tubes should be empty. All that's left is to slide-hammer the fork apart. First remove this spring clip under the dust wiper. Then, holding the upper tube in one hand and the lower tube in the other, slide the fork together, and jerk it lightly to full extension. Repeat this until the two tubes come apart.Dirt Rider
09 The old seal, bushings and a washer will all come out with the steel tube. On some models that washer can cup and should be replaced. On modern forks it may be a machined part that must go in a certain direction, so make note of its orientation.Dirt Rider
10 Remove the old bushings. One slides off, the other must be spread by inserting fingernails into this vertical slot. You can see that the Teflon coating is peeled back from the removal process. This bushing must be replaced with a new one.Dirt Rider
11 The bushings are steel but are plated with brass and the wear surface is coated with Teflon. We straightened this bushing to make the wear easier to see. If you can see the steel on the side opposite the Teflon, like on this one, get new ones.Dirt Rider
12 Race Tech recommends changing the bushing often, anyway. This close-up photo of the bushing surface reveals metal chips imbedded in the surface of the Teflon. Metal chips aren\'t as nice to slide on as Teflon, so this bushing is toast.Dirt Rider
13 The damping pistons and valve shims are held on with a nut that's locked on by mushrooming the end of the shaft. To remove the nuts it's necessary to file or grind the spread or mushroomed part of the cartridge rod and the compression base valve. Williams has the control to grind it. We'd recommend a file.Dirt Rider
14 Once the staked end is ground smooth, the nut holding the valve stack on should come off easily. Race Tech uses a wire bent into a \"J\" shape to remove the parts. The wire is held against the threaded end, and the parts slide up onto the wire. The wire is flipped over, and the parts are held in the crook of the "J" for cleaning.Dirt Rider
15 The valving shims must flex to control the flow of oil through the damping pistons. Eventually that flex will fatigue and wear out the shims. If the shims have wear marks, then they should be replaced. These aftermarket blue shims are easier to see wear on than silver ones, but the wear still shows on the silver ones.Dirt Rider
16 The wear patterns on this damping piston illustrate the surface is no longer perfectly flat, so sealing is compromised. Race Tech surfaces the pistons on a 120-grit adhesive sanding disc stuck onto a square of plate glass. This returns all of the sealing surfaces to true flat for correct sealing.Dirt Rider
17 Both sides of the piston (new, used, stock or Gold Valve) are surfaced until the sealing faces are uniformly shiny. This fork was already modified, but if you\'re going through the trouble of replacing the shims, the jump to a Gold Valve kit to get new parts and updated valving is a good idea.Dirt Rider
18 Polish the cartridge rod by hand with 000 steel wool. You only need to worry about the portion of the rod that the seal touches during full travel. You don\'t need to buff it like chrome, but clean it up. Steel wool leaves micro-slivers of steel wool around, so clean the parts well with contact cleaner before using the cartridge rod.Dirt Rider
19 Clean the parts of the damping pistons with a cleaner that doesn\'t leave an oily residue. Williams built a new shim stack with new shims, then assembled the base valve and cartridge rod. Instead of staking the nuts, Race Tech uses red Loc-tite and torques the nuts to 45 inch-pounds.Dirt Rider
20 If you find deep scratches like this, Race Tech suggests replacing the legs ($230-plus each for this fork, but cheaper than quality replating). The company won\'t warranty the seals if there are deep scratches present. Race Tech mounts fork legs on a specially modified drill press and buffs the surface with 500-grit emery cloth. Deeper scratches must be dressed with a super-fine dressing stone.Dirt Rider
21 Like the inner chrome tube, the outer aluminum tube should be inspected for damage. Hold up the cleaned tube to the light and look through it. The shiny oval you see is a hole worn through the hard anodizing. New tubes for this fork are almost $500 each. Race Tech can hard-anodize the tubes (clear or black) for $100 each.Dirt Rider
22 With all the parts cleaned up and repaired where necessary, it's time to start reassembly. These are the new parts that are going in this fork. Race Tech offers them, but everything except the blue cartridge seal can be obtained from your dealer. We also installed new shims, though they aren't shown here.Dirt Rider
23 Each seal and bushing is installed with Race Tech seal grease. The bushings are greased on both sides, and the seals get enough grease to make them slide easily for assembly and when the fork is first used. That is a light coat. You don't want any gobs of grease in the system.Dirt Rider
24 Before installing the bushing holder back on the cartridge rod, it needs to have both surfaces clean and free from grease and oil. Then apply red Loc-tite to make sure it won\'t come loose. Many of these parts are made with extremely fine threads in aluminum, so they can\'t stand a lot of torque.Dirt Rider
25 Once the bushing holder is torqued, you can grease the piston band on the cartridge rod before sliding it up into the cartridge body. The bottom of the cartridge is open until the base valve is installed.Dirt Rider
26 With the cartridge rod in the cartridge body and the rod extending up through the bushing, the hydraulic bottoming stop piston can go back on. Be careful not to lose the small clips. Thread the two halves together and tighten them. Don't go crazy leaning on the wrenches.Dirt Rider
27 You can cut the corner off of a sandwich bag to cover the sharp edges on the fork tube, but Race Tech sells these cool narrow bags for the purpose. The plastic bag keeps the machined edges from cutting the delicate seal lips. With the grease on the inside of the seal it will slide right over the bag.Dirt Rider
28 The fork cap is locked to the cartridge rod with a lock nut. Kayaba forks on bikes made from 1989-\'95 can have the rod break right at the threads. The problem has been traced to vibration, and it\'s worse on 500s than other models. Race Tech has made a longer brass nut, and it solved the problem.Dirt Rider
29 Our fork had a stack of preload spacers in each fork leg. Williams decided to check the preload. With the cartridge fully assembled (but outside the fork) and the cap on, set the spring against the spring seat and then measured to the top of the spring and to the bottom edge of the fork cap. We had 490mm to the top of the spring and 500mm to the cap.Dirt Rider
30 Williams measured the stack of preload washers with a digital caliper, and the measurement was close enough to 15mm. Since the accepted norm for fork spring preload is 10mm, the fork needed the spacers it had been using.Dirt Rider