
15
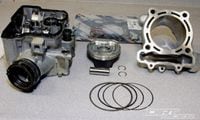
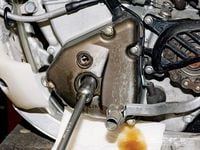
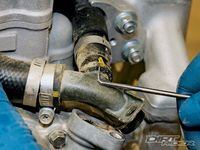
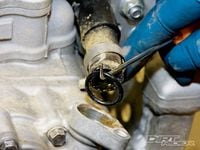
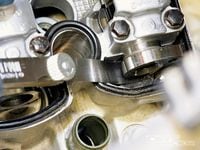
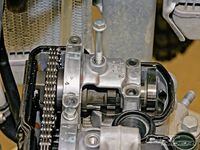
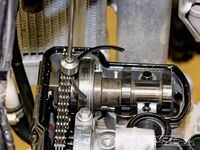
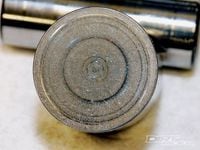
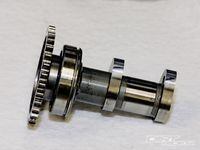
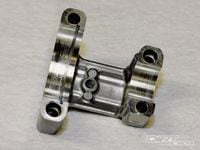
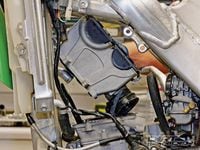
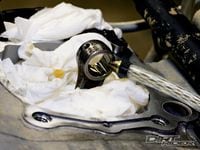
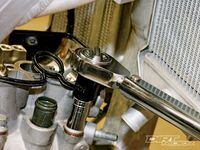
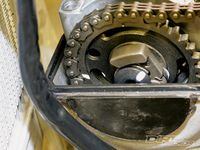
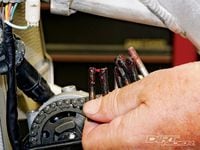
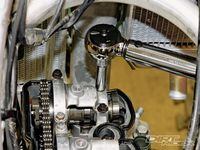
Increasing displacement is one of the most cost-effective ways available to boost the real-world power of your bike's engine. These days, you have more options in your method of growing bore size than ever, from having the stock cylinder sleeved with a cast-iron sleeve to installing completely new cast or billet cylinders with a plated aluminum bore-just like a stock cylinder.Regardless of the method used to boost the bore, the job of installing the kit remains the same. We used a 2007 Kawasaki KX250F and an Athena 290cc kit that includes a complete new cylinder. The Athena kit comes with everything needed for the installation. Even though we used a Kawasaki, any four-stroke is essentially the same.01 Any time you begin engine work, start by draining the coolant as well as the oil. The coolant is a necessity, but the oil is just a good plan to eliminate the chance of a mess. Make sure the bike is good and clean before you start; you may want to rewash it after the tank and seat are off.02 Remove the valve cover and the appropriate timing plugs. Use a T-handle to turn the engine to top dead center. There are marks on the ignition that need to be lined up to ensure the piston is at the top of the stroke. The manual will specify the correct marks and their position.03 On the KX-F the coolant hoses are in the way, and they need to be removed for best access to the cylinder area. The constant heating and cooling of the engine sort of glues the hoses to the fittings. A right-angle hook like this will slide under the hose. Pull it around and it will pop the hose loose.04 We removed the water fitting from the case for better access. It is sealed by an O-ring, so we used the hook again to retrieve the O-ring without damaging it. The Athena kit does not include this O-ring, so purchase one if it looks damaged or deformed.05 Before you can deal with the head, it is a good idea to check the valve clearance. If they're radically loose or tight, you'll need to have the head rebuilt to prevent wasting the other new parts you're installing. Write down the clearance so you have it for reassembly.06 Remove the caps that hold the cams in place. These are high-precision parts with important clearances and torque values, so loosen the bolts a bit at a time in a crisscross pattern. Remove them carefully. Threading a bolt into the cam cover holes will help you lift them up gently.07 There are usually parts under the caps that can fall into the engine, so lift the caps a bit at a time. Use a magnet to remove these steel clips that locate the cam bearings. You may want to remove the tappets and shims, but mark where they came from. Watch the dowels that locate the caps, too.08 Before you can start with the cams, the cam-chain tensioner must be removed to allow enough slack in the cam chain to remove the cams. Start by taking out the center bolt and the spring that operates the tensioner. Check the aluminum washer under the center cap. If it is deformed, replace it.09 Usually the tensioner can only go in one way, but we marked the top with a marker to make sure it would go back in quickly and correctly. If there is a gasket under the tensioner casting, it should be replaced whenever the tensioner is removed.10 On this Kawasaki the head won't come out easily unless the engine is rocked forward. We removed the head stay, engine mount plates and the lower engine mount bolt. We didn't have to loosen the swingarm pivot bolt to rotate the engine forward.11 With the engine rotated forward, the head has just enough room to clear this part of the frame where the head stay attaches. Unless the head can clear, it won't lift high enough to pass the cam-chain slides.12 Now you can lift the cams out. Begin by lifting the end on the exhaust cam, then angling it to clear the chain. There is no need to label the cams. The exhaust cam has the auto-decompression system, so it looks nothing like the intake cam.13 While the cams are out, inspect the parts of the valve train for wear. Defined swirly marks like these on the face of the tappets mean it is time to replace them. This means the tappets are rotating in the bore as they are supposed to.14 The lobes of the cam shouldn't show any wear or serious discoloration. The bearing surface of the cam should be absolutely smooth and unmarked. The left side of the cam has a bearing, but the right side generally rides on aluminum protected by a high-pressure oil film. Any flaws mean the engine had a lubrication failure.15 The same is true of the cam caps. The side that rides on the cam without a bearing should be perfectly smooth and show no wear. Otherwise, the oil film the cams are supposed to run on will not work correctly.
21
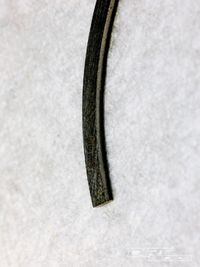
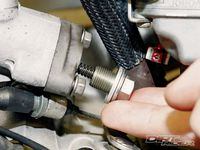
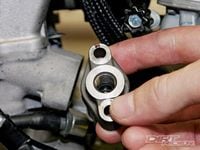
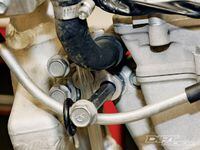
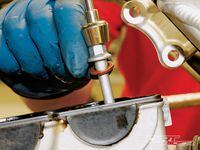
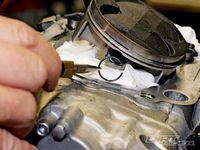
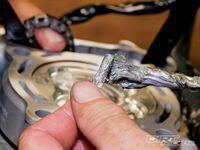
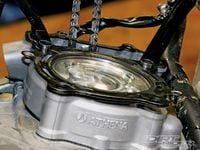
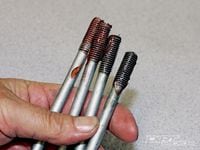
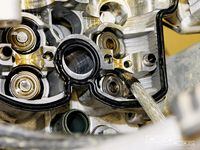
16 Loosen the head bolt or nuts a bit at a time working in a crisscross pattern. Note which bolts are inside the engine and which are out. On a Honda the washers must go on the bolt a certain way, so note how they're oriented as the engine comes apart.17 On the Kawasaki the head bolt washers are copper, so if you lose one down the cam-chain galley, you won't be digging it out with a magnet. Use care and you won't have a problem with dropping them.18 Even with the engine rotated forward in the frame, the head won't lift straight up and out. If you haven't removed the tappets, make sure you keep track of them as the head is tipped up. You don't want to drop them or lose their location.19 Lift off the cylinder and remove the piston. We used a small pick to pop the circlip, then pulled it out with needle-nosed pliers. Note that we packed the bottom end with paper towels before popping the clip. Support the piston while you push out the piston pin. The connecting rod doesn't like side loads.20 We slipped the old piston into the new cylinder for a comparison. To go from 250cc to 290cc with bore only, the bore diameter needs to grow quite a bit. The carbon on the top of the piston is normal. The oversize piston crown may look very different to maintain the standard compression ratio.21 If the rings have marks on them like this one, the marks (letters or numbers) go up. The manual will have a diagram of how the rings should be staggered for a proper installation. Basically, the ring end-gaps should not line up and should be offset equally around the diameter of the piston.22 Frequently, a big-bore cylinder will have less of a chamfer at the bottom, and that makes getting the rings in the cylinder harder. If you have the room to install the pin clip, sometimes it's easier to put in one clip, then install the piston and get the rings started while the cylinder is on the bench. Oil the piston pin area before you install the piston/cylinder combo.23 After checking the fit of the piston pin to the connecting rod, lube the small end. It needs the lubrication for start-up. We still have the bottom end packed with towels until the final circlip is installed and seated. The base gasket surface must be clean for the new gasket to seal properly.24 Lower the cylinder and piston together to the connecting rod, push the pin in and install the circlip. Since the piston is already in the bore, push the cylinder down as soon as the circlips are seated. In addition to the four main bolts, there are some smaller bolts on the cam chain side. We used anti-seize on the threads.25 Pull the cam chain tight and move the piston up and down with the kickstarter to make sure everything is working right. Install the new head gasket and the dowel sleeves. A multilayer gasket like this can leak if it gets any junk between the layers, so keep everything clean. The chain slides must mount under the gasket.26 Use a little assembly lube on the threads of the cylinder head bolts or nuts. Lube ensures correct torque and prevents corrosion on the threads for the next time you rebuild the engine.27 Work up to the final torque settings. The manual will have a diagram of the tightening sequence, but basically you work in an "X" pattern. Make sure to follow the recommended torque with a good quality torque wrench.28 Make sure all the parts of the cylinder head are clean as you assemble them, but that is doubly true of the cam bearing area. Once everything is surgically clean, oil up the parts where the cams run so they don't gall on start-up.29 Make sure all the timing marks are lined up as you install the cam(s). Every brand and model does this a little differently, but the principle is the same for an air-cooled 50cc or a full-race 650 liquid-cooled four-stroke.30 The Kawasaki has dots at the top of the cams, and other dots-highlighted with paint pen-that must align with the machined top surface of the head. It just takes a little patience to double-check the alignment. Use your finger to put pressure through the cam-chain tensioner hole.31 When you're sure of the cam timing, install all the cam holder bolts with some assembly lube or anti-seize on the threads. We wiped off any excess before installation. The torque values on these bolts are super low, so an accurate reading is a must.32 Again, work in an "X" pattern. The torque on these bolts is so light (no matter what brand or model) that the setting is generally less than a half turn past finger-tight. If you are going tighter than that, check the wrench, the settings and the threads.At this point all that is left is buttoning up the bike and adding the necessary fluids. The torque value on the valve cover bolts is also extremely light, and stripping one is very expensive since it generally means a new head, so be careful. Remember that you'll need to install the cam-chain tensioner as well. Retract it before installing, then add the spring and center cap after the tensioner is in place. Break in the motor with three good heat/cool cycles, and you're ready to rock your newfound torque.


/cloudfront-us-east-1.images.arcpublishing.com/octane/SQ3CEIVCOJF7FDERDVDKKPIC7A.jpg)
/cloudfront-us-east-1.images.arcpublishing.com/octane/LLLQLRK2DBH4PN66MDNA3AFJNY.jpg)
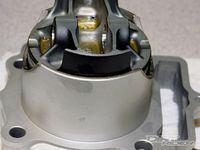
/cloudfront-us-east-1.images.arcpublishing.com/octane/5DMU4K752FBWLLJD432GRAAH2A.jpg)
/cloudfront-us-east-1.images.arcpublishing.com/octane/TGHDVMIODJC4BNKJDZKKTSWXWI.jpg)
/cloudfront-us-east-1.images.arcpublishing.com/octane/5KYMT24REJEFPNO2J2M76MXERM.jpg)

/cloudfront-us-east-1.images.arcpublishing.com/octane/3GXGR3EKSNH5NI3CWHV5SJ7TXE.jpg)
/cloudfront-us-east-1.images.arcpublishing.com/octane/JEU3ONDWEFCAZNAZJOU24OJ2PM.jpg)
/cloudfront-us-east-1.images.arcpublishing.com/octane/JQ6LMK6LLBAQJIL2AH56UIUKWU.jpg)
/cloudfront-us-east-1.images.arcpublishing.com/octane/QUSF4LLRM5DDPCJW25RINQRJPE.jpg)
/cloudfront-us-east-1.images.arcpublishing.com/octane/FYDGK7GF4JBPXERA5RAZPY3YJI.jpg)
/cloudfront-us-east-1.images.arcpublishing.com/octane/JE7KMNASNRGR7FLYAFRZAR7T7E.jpg)
/cloudfront-us-east-1.images.arcpublishing.com/octane/7RCNKJJNXBF4LBKZXE2INNWZUY.jpg)
/cloudfront-us-east-1.images.arcpublishing.com/octane/BAGM5E4EWBHFNLZOXMSLOLKQGU.jpg)
/cloudfront-us-east-1.images.arcpublishing.com/octane/RSX65VBXY5FRLIY4LN6WLOKAFM.jpg)
/cloudfront-us-east-1.images.arcpublishing.com/octane/3EO2CNKWUFBGNMGNJPETW5HCNY.jpg)
/cloudfront-us-east-1.images.arcpublishing.com/octane/IYHM55XRNVHF3DSS3467PZ7ONQ.jpg)
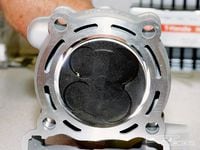
/cloudfront-us-east-1.images.arcpublishing.com/octane/L7K3FIINEBHMZI2TXTUE4FXH7I.jpg)
/cloudfront-us-east-1.images.arcpublishing.com/octane/XE7P5YXNZZDUTIGW4YNWQRDVY4.jpg)
/cloudfront-us-east-1.images.arcpublishing.com/octane/AV55DOHQ3BEXJLPWR6UWLYUSAQ.jpg)
/cloudfront-us-east-1.images.arcpublishing.com/octane/MMROGOYHXZAYDC4RKIDJ4VRSGA.jpg)
/cloudfront-us-east-1.images.arcpublishing.com/octane/FHRWLPEOTBFOHFTQLIHJNIXCFQ.jpg)
/cloudfront-us-east-1.images.arcpublishing.com/octane/J2RUDOXTOZHBXOFCUQKBAGBMAQ.jpg)
/cloudfront-us-east-1.images.arcpublishing.com/octane/UDQASRGJ3ZDG3BANXWU6P5NIQY.jpg)